2013-04-08

View Office documents in WPF Application

Well. The answer is DocumentView WPF control.


  1. First the office document should be converted to XPS type document. Please look at this post.
  2. Then bind it to the Document property of the DocumentViewer control.
XAML

<DocumentViewer Name="myDocumentViewer" Margin="0,0,0,59">

</DocumentViewer>

And code behind;

myDocumentViewer.Document = this.ConvertOfficeDocToXPSDoc(this.FileName, this.newXPSDocumentName).GetFixedDocumentSequence();

That's all you need to do.

2013-03-07

WPF TabControl with close button - MVVM

In this post I'm going to bind a collection of item to a TabControl with MVVM pattern.

Prerequisites : Data binding,

1. Add a new project


2. Add new folders called "ViewModels" and "Infrastructure"


3. Create a new class called "ViewModelBase" to the "Infrastructure" folder and add the below code.

ViewModelBase is the base class for all view model. It is inherited by INotifyPropertyChanged and has implemented the NotifyPropertyChanged method. So whenever there is an update for the viewmodel, it notifies the UI and updates.


public class ViewModelBase : INotifyPropertyChanged
    {
        /// <summary>
        /// Occurs when a property value changes.
        /// </summary>
        public event PropertyChangedEventHandler PropertyChanged;
        /// <summary>
        /// Notifies the property changed.
        /// </summary>
        /// <param name="propertyName">Name of the property.</param>
        protected void NotifyPropertyChanged(string propertyName)
        {
            if (PropertyChanged != null)
            {
                PropertyChanged(this, new PropertyChangedEventArgs(propertyName));
            }
        }
    }


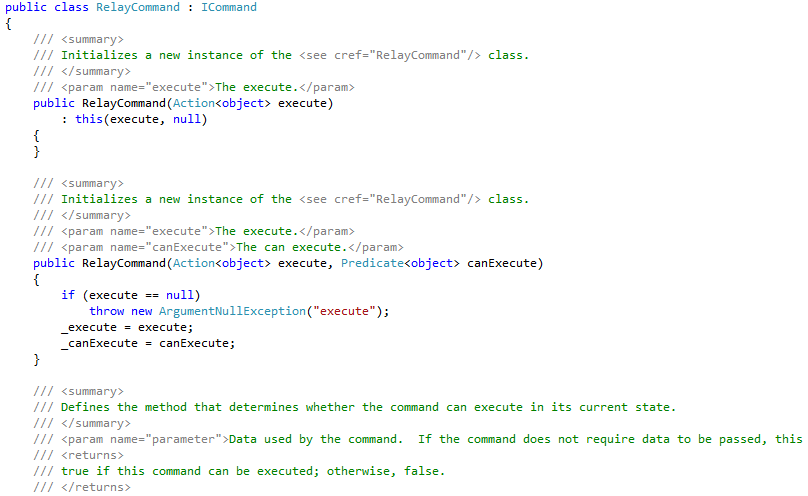
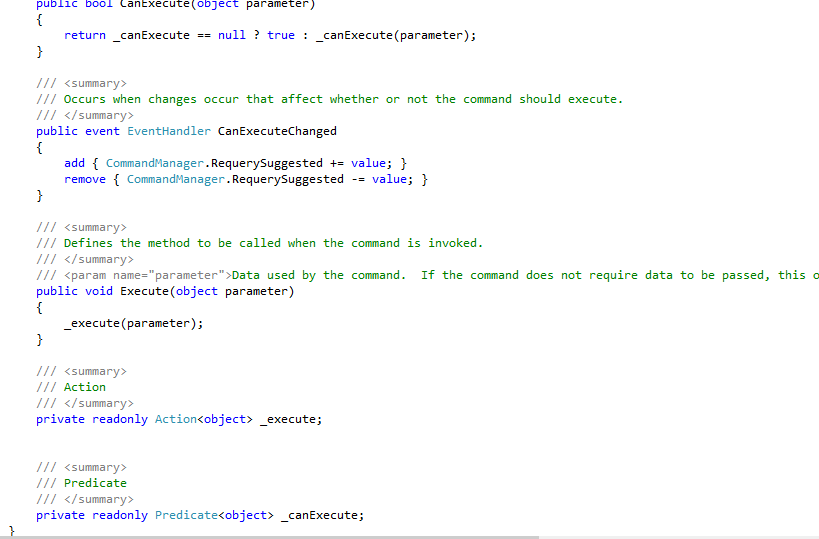
4. Add a class called "RelayCommand" to the "Infrastructure" folder and add the code below.

This is responsible for commands for the view model.


public class RelayCommand : ICommand
    {
        /// <summary>
        /// Initializes a new instance of the <see cref="RelayCommand"/> class.
        /// </summary>
        /// <param name="execute">The execute.</param>
        public RelayCommand(Action<object> execute)
            : this(execute, null)
        {
        }
        /// <summary>
        /// Initializes a new instance of the <see cref="RelayCommand"/> class.
        /// </summary>
        /// <param name="execute">The execute.</param>
        /// <param name="canExecute">The can execute.</param>
        public RelayCommand(Action<object> execute, Predicate<object> canExecute)
        {
            if (execute == null)
                throw new ArgumentNullException("execute");
            _execute = execute;
            _canExecute = canExecute;
        }
        /// <summary>
        /// Defines the method that determines whether the command can execute in its current state.
        /// </summary>
        /// <param name="parameter">Data used by the command.  If the command does not require data to be passed, this object can be set to null.</param>
        /// <returns>
        /// true if this command can be executed; otherwise, false.
        /// </returns>
        public bool CanExecute(object parameter)
        {
            return _canExecute == null ? true : _canExecute(parameter);
        }
        /// <summary>
        /// Occurs when changes occur that affect whether or not the command should execute.
        /// </summary>
        public event EventHandler CanExecuteChanged
        {
            add { CommandManager.RequerySuggested += value; }
            remove { CommandManager.RequerySuggested -= value; }
        }
        /// <summary>
        /// Defines the method to be called when the command is invoked.
        /// </summary>
        /// <param name="parameter">Data used by the command.  If the command does not require data to be passed, this object can be set to null.</param>
        public void Execute(object parameter)
        {
            _execute(parameter);
        }
        /// <summary>
        /// Action
        /// </summary>
        private readonly Action<object> _execute;

        /// <summary>
        /// Predicate
        /// </summary>
        private readonly Predicate<object> _canExecute;
    }

 5.  Add another view model called "MyTabItem" to represent a tab and add the code below. (Inherit if from the ViewModelBase class)


        public class MyTabItem : ViewModelBase
    {
        #region Properties
        public string Header { get; set; }
        public string Content { get; set; }
        public string closeButtonVisibility { get; set; }
        public string CloseButtonVisibility
        {
            get
            {
                return closeButtonVisibility;
            }
            set
            {
                closeButtonVisibility = value;
                NotifyPropertyChanged("CloseButtonVisibility");
            }
        }
        #endregion
    }


Here the CloseButtonVisibility property will be bound to the visibility of the button which will be appeared in the tab header. And you can see this property is observable. Therefore whenever the property is changed, it will affect to the visibility of the closing button of the tab.

6. Now add a view model class for the MainWindow.xaml called "MainViewModel" to the "ViewModels" folder and inherit it from the ViewModelBase class.

          a. Create a MyTabItem ObservableCollection


This property will be bound to the ItemsSource property of the TabControl.
If you have three items in the collection then three tabs will be appeared.
If you add a new item to the collection, a new tab will be appeared.
If you remove an item, that tab will be disappeared.

          b. Add a SelectedTab property


This property will be bound to the "SelectedItem" of the TabControl
If you wanna select a tab, then assign the tab to this property. And if you need the selected tab, you can get it from this property.

          c. Now add "CloseTabCommand"


This Command will be bound to to the Command property of the close button of the tab item.
CloseTab method will be executed whenever the close button is clicked.

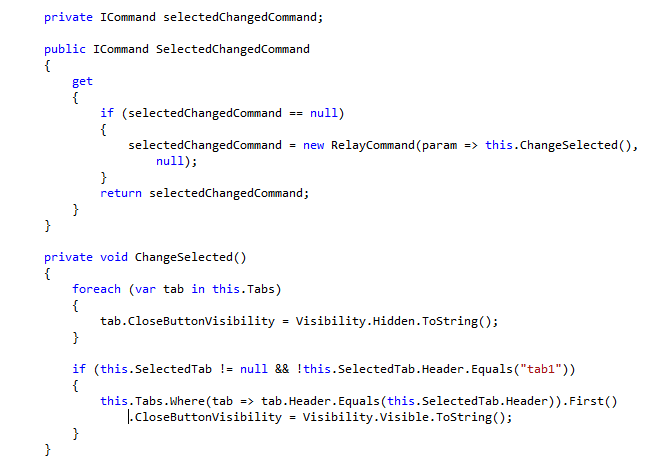
          d. Add "SelectedChangedCommand" Command


This Command will be bound to "SelectionChanged" event of the tab.
I have implemented the ChangeSelected method so that whenever the tab is selected the close button will be displayed for that tab. (for tab1, this will not happen)      

          e. Add some dummy data in the constructor


Here tow tabs are created and the tab1 is selected.

OK. Now its time to bind the UI.

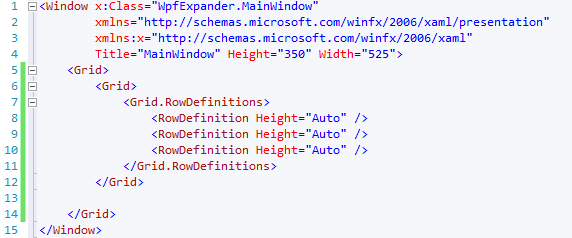
          f. Please change your XAML to following


<Window x:Class="TabControl.MainWindow"
        xmlns="http://schemas.microsoft.com/winfx/2006/xaml/presentation"
        xmlns:x="http://schemas.microsoft.com/winfx/2006/xaml"
        xmlns:i="http://schemas.microsoft.com/expression/2010/interactivity"
        Title="MainWindow" Height="350" Width="525">
    <Grid Name="mainGrid">
        <TabControl
            Height="211"
            HorizontalAlignment="Left"
            Margin="12,20,0,0"
            Name="tabControl1"
            VerticalAlignment="Top"
            Width="479"
            ItemsSource="{Binding Tabs}"
            SelectedItem="{Binding SelectedTab}">
            <!--Bind the SelectionChanged event of the tab-->
            <i:Interaction.Triggers>
                <i:EventTrigger EventName="SelectionChanged">
                    <i:InvokeCommandAction Command="{Binding SelectedChangedCommand}" />
                </i:EventTrigger>
            </i:Interaction.Triggers>
            <!--Header section-->
            <TabControl.ItemTemplate>
                <DataTemplate>
                    <StackPanel Orientation="Horizontal">
                        <TextBlock Text="{Binding Header}" Margin="0 0 20 0"/>
                        <Button Content="X"
                                Command="{Binding RelativeSource=
                       {RelativeSource FindAncestor,
                       AncestorType={x:Type TabControl}},
                       Path= DataContext.CloseTabCommand}"
                                Width="10" Height="10" FontWeight="UltraBold" Background="#FF6699 " FontSize="5"
                                Foreground="White"
                                Visibility="{Binding CloseButtonVisibility}"/>
                    </StackPanel>
                </DataTemplate>
            </TabControl.ItemTemplate>
         
            <!--Content section-->
            <TabControl.ContentTemplate>
                <DataTemplate>
                    <TextBlock
                    Text="{Binding Content}" />
                </DataTemplate>
            </TabControl.ContentTemplate>
         
        </TabControl>
    </Grid>
</Window>


you have to add
xmlns:i="http://schemas.microsoft.com/expression/2010/interactivity".
To have this you have to install a redistributable. you can download it from the following link
http://www.microsoft.com/en-us/download/details.aspx?id=10801 

          g. Final thing.. Add the following code inside the MainWindow constructor (which is in Code behind class)
mainGrid.DataContext = new MainViewModel();


          h. Now run the program and see the results. 

Well.. Here is my MainViewModel class


public class MainViewModel : ViewModelBase
    {
        #region Enums
        /// <summary>
        /// Close button visibility options for the tab control.
        /// </summary>
        public enum Visibility
        {
            /// <summary>
            /// Close button is hidden.
            /// </summary>
            Hidden,
            /// <summary>
            /// Close button is visible.
            /// </summary>
            Visible
        }
        #endregion
        #region Declarations
        private ObservableCollection<MyTabItem> tabs;
        private MyTabItem selectedTab;
        private ICommand addTabCommand;
        private ICommand closeTabCommand;
        private ICommand selectedChangedCommand;
        #endregion
        #region Properties
        /// <summary>
        /// Gets or sets the tabs.
        /// </summary>
        /// <value>The tabs.</value>
        public ObservableCollection<MyTabItem> Tabs
        {
            get
            {
                return tabs;
            }
            set
            {
                tabs = value;
                NotifyPropertyChanged("Tabs");
            }
        }
        /// <summary>
        /// Gets or sets the selected tab.
        /// </summary>
        /// <value>The selected tab.</value>
        public MyTabItem SelectedTab
        {
            get
            {
                return selectedTab;
            }
            set
            {
                selectedTab = value;
                NotifyPropertyChanged("SelectedTab");
            }
        }
        #endregion
        #region Commands
        /// <summary>
        /// Gets the add tab command.
        /// </summary>
        /// <value>The add tab command.</value>
        public ICommand AddTabCommand
        {
            get
            {
                if (addTabCommand == null)
                {
                    addTabCommand = new RelayCommand(param => this.AddTab(),
                        null);
                }
                return addTabCommand;
            }
        }
        /// <summary>
        /// Gets the close tab command.
        /// </summary>
        /// <value>The close tab command.</value>
        public ICommand CloseTabCommand
        {
            get
            {
                if (closeTabCommand == null)
                {
                    closeTabCommand = new RelayCommand(param => this.CloseTab(),
                        null);
                }
                return closeTabCommand;
            }
        }
        /// <summary>
        /// Gets the selected changed command.
        /// </summary>
        /// <value>The selected changed command.</value>
        public ICommand SelectedChangedCommand
        {
            get
            {
                if (selectedChangedCommand == null)
                {
                    selectedChangedCommand = new RelayCommand(param => this.ChangeSelected(),
                        null);
                }
                return selectedChangedCommand;
            }
        }
        #endregion
        #region Constructors
        /// <summary>
        /// Initializes a new instance of the <see cref="MainViewModel"/> class.
        /// </summary>
        public MainViewModel()
        {
            this.Tabs = new ObservableCollection<MyTabItem>();
            //Create sample data for the tabs
            MyTabItem tab1 = new MyTabItem();
            tab1.Header = "tab1";
            tab1.Content = "Tab 1 content";
            tab1.CloseButtonVisibility = Visibility.Hidden.ToString();
            this.Tabs.Add(tab1);
            MyTabItem tab2 = new MyTabItem();
            tab2.Header = "tab2";
            tab2.Content = "Tab 2 content";
            tab2.CloseButtonVisibility = Visibility.Hidden.ToString();
            this.Tabs.Add(tab2);
            this.SelectedTab = tab1;
        }
        #endregion
        #region Private Methods
        /// <summary>
        /// Adds the tab.
        /// </summary>
        private void AddTab()
        {
            //check whether the tab3 exists
            bool doesTab2Exist = Tabs.Select(t => t.Header).Contains("tab3");
            //If tab2 doesn't exist
            if (!doesTab2Exist)
            {
                MyTabItem tab3 = new MyTabItem();
                tab3.Header = "tab3";
                tab3.Content = "Tab 3 content";
                tab3.CloseButtonVisibility = Visibility.Visible.ToString();
                this.Tabs.Add(tab3);
            }
        }
        /// <summary>
        /// Closes the tab.
        /// </summary>
        private void CloseTab()
        {
            this.Tabs.Remove(this.SelectedTab);
        }
        /// <summary>
        /// Changes the selected.
        /// </summary>
        private void ChangeSelected()
        {
            foreach (var tab in this.Tabs)
            {
                tab.CloseButtonVisibility = Visibility.Hidden.ToString();
            }
            if (this.SelectedTab != null && !this.SelectedTab.Header.Equals("tab1"))
            {
                this.Tabs.Where(tab => tab.Header.Equals(this.SelectedTab.Header)).First().CloseButtonVisibility = Visibility.Visible.ToString();
            }
        }

        #endregion
    }


Beautiful isn't it?


2013-03-06

Simple WPF Expander Example


  1. Create a WPF project


   2. Add a Grid which has three rows (you can add any number of rows - here in this example, I'm going to use three expanders)


  NOTE: Make sure that the height of the row is set to Auto. This makes the expander resizable.
  3.  Now add three expanders

Use Grid.Row property to set the expanders to the grid rows.

  4. Now add some contents inside the expanders

  5. Run the program

You will see the results


The trick is setting the height of the grid row to "Auto"

This is the full Xaml Code

<Window x:Class="WpfExpander.MainWindow"
        xmlns="http://schemas.microsoft.com/winfx/2006/xaml/presentation"
        xmlns:x="http://schemas.microsoft.com/winfx/2006/xaml"
        Title="MainWindow" Height="350" Width="525">
    <Grid>
        <Grid>
            <Grid.RowDefinitions>
                <RowDefinition Height="Auto" />
                <RowDefinition Height="Auto" />
                <RowDefinition Height="Auto" />
            </Grid.RowDefinitions>
            <Grid.ColumnDefinitions>
                <ColumnDefinition Width="400" />
            </Grid.ColumnDefinitions>
            
            <Expander Grid.Row="0" Header="Expander 1">
                <StackPanel>
                    <Label>This is Expander 1</Label>
                    <Button Content="Test button 1" Width="80"/>
                </StackPanel>
            </Expander>
            
            <Expander Grid.Row="1" Header="Expander 2">
                <Grid>
                    <Grid.RowDefinitions>
                        <RowDefinition Height="Auto" />
                        <RowDefinition Height="Auto" />
                        <RowDefinition Height="Auto" />
                        <RowDefinition Height="Auto" />
                    </Grid.RowDefinitions>
                    <Grid.ColumnDefinitions>
                        <ColumnDefinition Width="150" />
                        <ColumnDefinition Width="200" />
                    </Grid.ColumnDefinitions>

                    <Label Content="This is expander 2" Grid.Row="0" Grid.Column="0" />
                    <Label Content="Name" Grid.Row="1" Grid.Column="0" />
                    <Label Content="Age" Grid.Row="2" Grid.Column="0" />

                    <TextBox Grid.Row="1" Grid.Column="1" />
                    <TextBox Grid.Row="2" Grid.Column="1" />
                    <Button Content="Submit" Grid.Row="3" Grid.Column="1" Width="80"/>
                </Grid>
            </Expander>
            
            <Expander Grid.Row="2" Header="Expander 3">
                <StackPanel>
                    <Label>This is Expander 3</Label>
                    <CheckBox />
                </StackPanel>
            </Expander>
            
        </Grid>
        
    </Grid>
</Window>

2011-10-27

WPF කුප්පි 2 - (Hello World WPF)

හරි.. අපි දැන් ඉතා සරල WPF application එකක් හදමු. අමාරු නෑ ..... හරි ලේසියි.

හරි....මුලින්ම Expression Blend වලින් WPF application එක හදන්නම්. ඊට පස්සේ ඒ application එක Visual Studio එකෙන් කොහොමද කරන්නේ කියල බලමු.
  1. මුලින්ම Expression Blend, open කර ගන්නකෝ.
  2. දැන් අලුත් project එකක් හදන්න.
File -> New Project... හෝ  Ctrl+Shift+N ගහන්න.

Figure 1

    3.  හරි... දැන් පල්ලෙහා තියෙනවා වගේ අලුත් window එකක්  එයි.
Figure 2

මම කරලා තියෙන විදියට WPF Application එකක් select කර ගන්න.

Name:       මේක තමයි අපි හදන්න යන WPF Project එකේ නම. කැමති නමක් දෙන්න පුළුවන්.
Location:   WPF Project එක save වෙන තැන.
Language:  Coding කරන language එක. Visual C sharp හෝ Visual Basic

හරි... දැන් OK button එක click කරන්න.

    4.  දැන් WPF Application එකේ Main Window එකට අලුත් button එකක් add කරමු. ඒකෙ content එක "Blend Button" කියල වෙනස් කරන්න.
  • button එකක් add කරන්නේ මෙහෙමයි.
මුලින්ම වම පැත්තේ තියෙන button icon එක select කරන්න (Figure 3). ඊට පස්සේ main Window eke ඒකෙ click කරලා button එක හදන්න (Figure 4).

Figure 3

Figure 4

  • button ඒකෙ content එක වෙනස් කරන්නේ මෙහෙමයි.
මුලින්ම වම් පැත්තේ තියෙන selection tool එක select කරලා (Figure 5) ඊට පස්සේ button එක මත double click කරලා content එක වෙනස් කරන්න (Figure 6).


Figure 5


Figure 6
                    
    හරි.... අපි දැන් අපේ application ඒකේ User Interface එක හදල ඉවරයි. දැන් අපි බලමු "Blend Button" button එක click කලාම message එකක් display වෙන්න හදන්නේ කොහොමද කියල. ඒ කියන්නේ button ඒකේ click event එක trigger කරන්නේ කොහොමද කියල බලමු.

    5.  "Blend Button" එක select කරලා දකුණු පැත්තේ කෙලවරේ තියෙන "Events" icon එක click කරන්න (Figure 7).

                                                                               Figure 7

    6. ඊට පස්සේ click event ඉස්සරහ තියෙන කොටුවේ BlendBtn_Click කියල නමක් දීල Enter ඔබන්න. (Figure 8)

Figure 8

දැන් අලුත් file එකක් open වෙයි. මේකට කියන්නේ  Code Behind File එක කියල. (Figure 9)

Figure 9
 
    7. දැන් අපි message එකක් display කරවමු.

මේ code එක BlendBtn_Click එක ඇතුලට දාන්න.

MessageBox.Show("Hi Blend Button");

    8. දැන් project එක Run කරන්න.

Project -> Run Project (F5 or Ctrl+F5 or Fn+F5)

Run කලාම එන window එකේ button එක click කලාම message එකක් display වෙයි. (Figure 10)

                                                                                Figure 10

ලේසියි නේ......

ඉවරයි කියල කිව්වට ඉවරම නෑ. දැන් අපි Visual Studio එකෙන් මේ project එකම open කරලා ඊට පස්සේ Visual Studio එකෙන් button එකක් add කරලා message box එකක් display කරවමු. ඒකත් ඉතින් මහා ලොකු වැඩක් නෙමේ.

    9. Project එක Visual Studio වලින් open කරන්න.

  • මුලින්ම Project එක තියෙන folder එක කර ගන්න. (Figure 11)
Figure 11

  • ඊට පස්සේ myHelloWorld.sln කියන file එක Visual Studio වලින් open කරන්න.
    10. දැන් අලුත් button එකක් add කරන්න. 
Visual Studio එකේ වම් පැත්තේ තියෙන toolbox එකෙන් button එකක් drag and drop කලා නම් හරි. (Figure 12)

Figure 12

    11. ඒ button එකේ content එක "VS Button" කියල වෙනස් කරන්න.

ඒ button එක  select කරලා ඊටපස්සේ property window (දකුණු අත පැත්තේ තියෙන්නේ) එකේ Common category එකේ content එක ඉස්සරහ කොටුවේ "VS Button" කියල දාන්න. එතකොට හරි. (Figure 13)
Figure 13


    12. දැන් මේ button එක මත double click කරන්න. එතකොට Code Behind File ඒකට යයි. දැන් "button1_Click" කියන function එක ඇතුලේ පල්ලෙහා තියෙන code එක දාන්න. (Figure 14)

MessageBox.Show("Hi VS Button");

Figure 14

    13. දැන් project එක Run කරන්න.

(Debug -> Start Debugging or F5 or fn+f5) or   
       
Figure 15


පල්ලෙහා තියෙන්නේ Run  කලාම එන එක. (Figure 16)

Figure 16


හුරේ............. වැඩේ ගොඩ.......... මේ Hello World WPF Applicaton එකෙන් චූටි අවබෝධයක් එන්න ඇති. මේක තම ආරම්භය. මේ post එකේදී මම කියල දුන්නේ කොහොමද User Interfaces හදන්නේ කියල. ඉස්සරහදි මම කියලා දෙන්නම් කොහොමද ලස්සන, professional User Interfaces හදන්නේ  කියල. ඊට අමතරව Database එකකින් Data Manipulate කරන හැටිත් කියල දෙන්නම්. එතකං මේ ඩිංග හොදට තේරුම ගන්නකො.

WPF කුප්පි 1 - (හැඳින්වීම)

WPF කියන්නේ මයික්‍රොසොෆ්ට් ලගේ UI Framework එකක්. මේකෙන් පුළුවන් සිරා User Interfaces හදන්න. Windows Forms වලට වඩා WPF වලින් මාරම වැඩ කෑලි ටිකක් දාන්න පුළුවන්. මේකේ User Interfaces හදන්න ගන්නේ XAML (Extensible Application Markup Language - " සැමල් " කියල උච්චාරණය කරන්නේ) කියල එකක්. Coding කරන්න ගන්නේ  C# හරි  VB languages.

WPF application හදන්න පුළුවන්  Visual Studio සහ  Expression Blend කියන සොෆ්ට්වෙයාර්ස් වලින්. User Interface හදද්දී  Expression Blend පාවිච්චි කරනවා නම් ගොඩාක් ලේසියි. Expression Blend වලින් coding කරන්නත් පුළුවන්. හැබැයි සමහර Coding කරන කොට Visual Studio පාවිච්චි කරනවා නම් හොදයි. කොටින්ම කියනවා නම් User Interface Expression Blend වලින් හදල Coding කරද්දී Visual Studio වලින් කරන්න.

WPF ගැන ඉගෙන ගන්න පුළුවන් Websites ටිකක්
http://www.kirupa.com/blend_wpf/index.htm
http://www.wpftutorial.net/Home.html


WPF ගැන ලියැවිලා තියෙන පොත් ටිකක් 
WPF 4 - Unleashed
WPF Control Development Unleashed
Windows Presentation Foundation - Unleashed 
Application = Code + Markup
Essential Windows Presentation Foundation
Foundations of WPF: An Introduction to Windows Presentation Foundation
Pro WPF in C# 2008
Foundations of WPF: An Introduction to Windows Presentation Foundation


හරි..... දැන් WPF ගැන පොඩි අවබෝධයක් එන්න ඇති. මම ඊලග පෝස්ට් ඒකෙන් (WPF කුප්පි 2 ) "Hello world" WPF Application එකක් හදන්නම්.